Author Archives: timoch

How to get confused by VC++

Today, I came across a confusing compilation error with MS VC++ using a std::unique_ptr with a custom deleter.

Here the code snippet:

The compiler complains :

1
2
3
4
5
6
7
8
9
10
11
12
13
c:\program files (x86)\microsoft visual studio 10.0\vc\include\memory(2218): error C2338: unique_ptr constructed with null deleter pointer
1> c:\program files (x86)\microsoft visual studio 10.0\vc\include\memory(2214) : while compiling class template member function 'std::unique_ptr::unique_ptr(std::nullptr_t)'
1> with
1> [
1> _Ty=void,
1> _Dx=void_delete
1> ]
1> c:\sources\source1.cpp(9) : see reference to class template instantiation 'std::unique_ptr' being compiled
1> with
1> [
1> _Ty=void,
1> _Dx=void_delete
1> ]

The gotcha is that the compiler complains of a reference to class template instantiation on line 9. This is the definition of f1().

However, the actual issue is on line 13 in the implementation of f2(). A std::unique_ptr is instantiated with a nullptr and no deleter. The nullptr constructor has a static_assert that protects from uninitialized function-pointer deleter. I wonder what could go wrong with an uninitialized function pointer … :-|

The compiler gives you the line of the first appearance of std::unique_ptr in the compilation unit not the actual line that causes the error … Easy enough to spot on a trimmed down example like this one. It tooks me quite some time to find in a code file with several hundred lines of code and many changes at once.
Animate a UIView out of thin air

Today, I was trying to animate a menu-like view so that it slides out of a bar of buttons at the bottom of my application.

Easy enough, I read some documentation about animations here. And I end up with code similar to this in the controller responsible for the sliding view:

Nothing spectacular. I make sure the initial view in outside the visible part of the screen and I animate the view into its final position.

Now my view slides up but in my case the final position is on top of another view. So there is content below its final position. My sliding menu ends up sliding up in front of the button bar and all. Not so nice but the solution is simple right ? just animate the height of the view as well. It will appear to slide out of the whichever view you selected as a reference view.

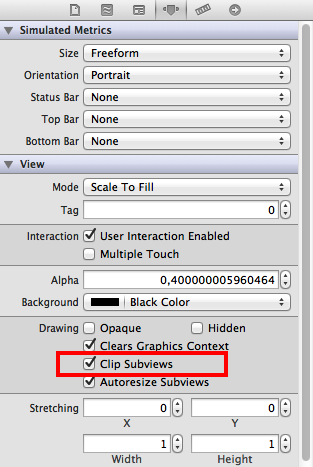
Well not so fast !! my view has kept its initial size. I had to search for a while. My view was not resizing because of its content. In the end, I had to change my views property so that it ‘Clips Subviews’

TiMoch on edge

Transparent background UISearchView

While I was working on a small iPhone application I was required to put a search box but with a transparent background. The original design looks like this:

I could not get the basic search control to not display its background. I tried using a standard text box, however the look and feel was not the same (the standard text view has round corners but here the whole side needs to a single half-circle).

I found a solution on stackoverflow.com : http://stackoverflow.com/questions/2913475/uisearchbar-transparent-background-view

However, the solutions I found there were not optimal because they required custom code for each usage of a search box with transparent background.

I really wanted a more reusable solution. I adapted one of the solutions but subclassed UISearchBar as follow:

in UITransparentBackgroundSearchBar.h:

and in UITransparentBackgroundSearchBar.m:

In your storyboard, set the search bar class to be UITransparentBackgroundSearchBar and voilà.

I am not that experienced with iOS development so there might be a gotcha I have not identified yet. I seems quite clean so I pretty confident.

Have fun,
TiMoch on edge

Setting up an Android development environment

I am a newbie with mobile application development. As I start fiddling around, I find it is not exactly straightforward to setup an Android development environment for the first time. This post tries to take you through the few steps required before you can run a very first Android application.

Installing Eclipse

First you want to install the Eclipse IDE. Eclipse is an Integrated Development Environment very much focused on Java development. Many plugins exist to extend its functionality. Some of which will make your life as an Android app developer much easier.

Point your browser to the Eclipse website eclipse.org and go to their download page.

Many options there. I picked the Eclipse Classic package as I don’t yet need specific plugins from the other package. If I understand correctly, the plugins can be installed later on anyway so you can choose any of the options. Once downloaded, simply extract the archive content to your working directory of choice.

The package is quite big so it might take a while. In the meantime, you can already check out the Android Developer website. It contains a lot of useful information about developing and designing mobile application.

Android SDK

The next piece of software you need is the Android SDK. You can find the download page here. Download and start the installation. The Android SDK setup will take care of installing the Java SE Development Kit if it is not installed already. Choose where to install the SDK and continue the installation.

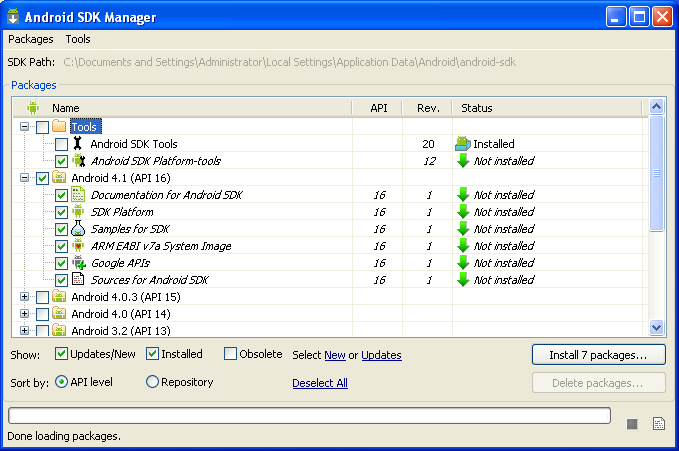
You are not done yet with the Android SDK installation. You still need to run the SDK manager to get the system images for the versions of Android you want to target. This is what it looks like:

The screen show the versions of Android that you can target for your applications. Each version shown exposes a different level of functionality of the Android framework and devices. We will use the latest version here. For more information on how the API is versioned, you should have a look here on the Android developer site : What is an API level ?

The ADT Plugin

We are almost there. The last step is to install the eclipse plugin to support Android development. This plugin will integrate the Android SDK components into Eclipse so that development is as straightforward as possible. The plugin is called Android Development Tools (ADT for short). You can find more information about it here.

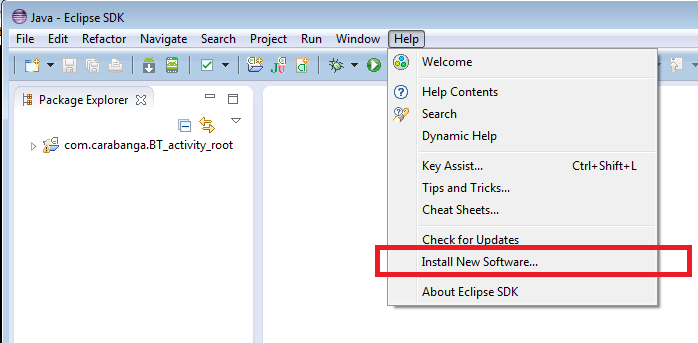
The installation is done directly within Eclipse so go ahead and start it. Go to menu Help -> Install New Software

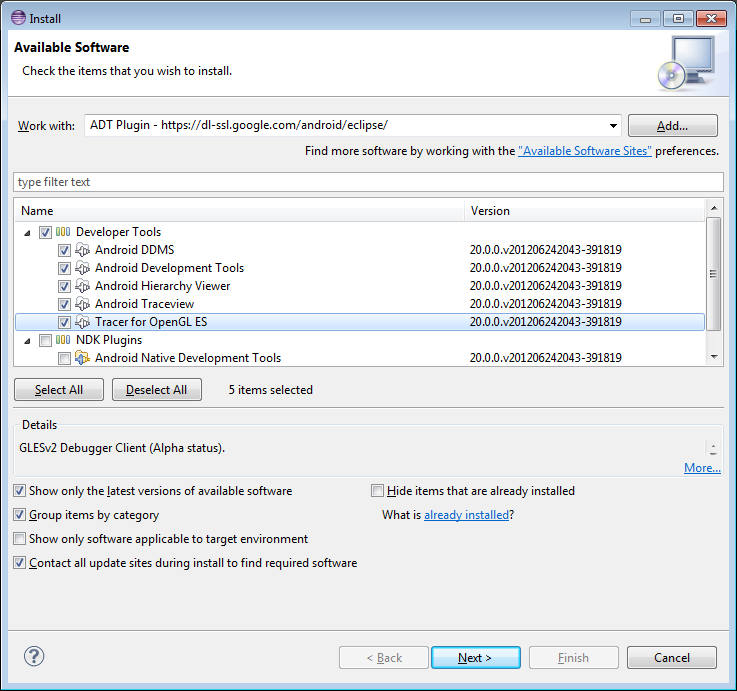
Add a new repository called ADT Plugin with the URL https://dl-ssl.google.com/android/eclipse/. Some time after selecting the repository, you should get a list of software similar to this. Select the whole Developer Tools branch and continue with the wizard by clicking Next.

And voilà ! ;) You can now create new Android projects and code away for your favorite device.

Conclusion

In order to develop Android applications, you need to get:

Once this is setup, all you need is to get creative :-)
Have fun!
TiMoch on edge